Ubuntu/Ubuntu+Apache+PHP+MySQL+Memcached
安装apache2和php5[ ]
<?
phpinfo();
?>
保存之后,启动apache服务器,输入:
/etc/init.d/apache2 start
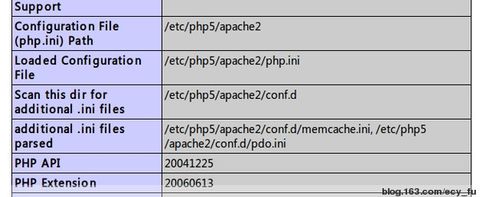
服务器启动成功之后,打开浏览器,在地址栏输入http://127.0.0.1/phpinfo.php,如果显示出php的信息,说明apache和php安装成功了。
安装mysql[ ]
sudo apt-get install mysql-server
安装完成按提示设置root密
让apache、php支持mysql[ ]
sudo apt-get install libapache2-mod-auth-mysql
sudo apt-get install php5-mysqlsudo /etc/init.d/apache2 restart
至此apache2+php 5+mysql 5的环境就完成了。
安装memcached[ ]
memcached需要使用libevent,所以在安装memcached之前,首先安装好libevent。memcached和libevent的安装过程用经典的三步就可以搞定。
/configure
make
make install
测试下memcached是否能够正常运行。
memcached -vv
此时能够看到很多显示信息,接下来Telnet到服务器上。
ecy@ecy-geek:~$ telnet 127.0.0.1 11211
Trying 127.0.0.1…
Connected to 127.0.0.1.
Escape character is ‘^]’.
set foo 0 0 3
bar
STORED
get foo
VALUE foo 0 3
bar
END
测试memcached服务器运行正常.
安装memcache[ ]
下载地址:http://pecl.php.net/package/memcache
从以上链接下载php的memcache extension。将memcache-2.2.5.tgz下载到本地之后,解压,接下来输入以下命令:
root@ecy-geek:/home/ecy/memcache-2.2.5# phpize
Configuring for:
PHP Api Version: 20041225
Zend Module Api No: 20060613
Zend Extension Api No: 220060519
root@ecy-geek:/home/ecy/memcache-2.2.5# make
/bin/bash /home/ecy/memcache-2.2.5/libtool –mode=install cp ./memcache.la /
/ecy/memcache-2.2.5/modules
libtool: install: cp ./.libs/memcache.so /home/ecy/memcache-2.2.5/modules/me
he.so
libtool: install: cp ./.libs/memcache.lai /home/ecy/memcache-2.2.5/modules/m
che.la
libtool: finish: PATH=”/usr/local/sbin:/usr/local/bin:/usr/sbin:/usr/bin:/sb
bin:/usr/games:/sbin” ldconfig -n /home/ecy/memcache-2.2.5/modules
———————————————————————-
………………………………….
root@ecy-geek:/home/ecy/memcache-2.2.5# make install
Installing shared extensions: /usr/lib/php5/20060613+lfs/
最后生成的扩展动态库文件会放在”/usr/lib/php5/20060613+lfs/”,不要去挪动它,php运行时会到”/usr/lib/php5/”目录下找这些扩展。为了使php能使用memcache,需要修改一个配置文件。
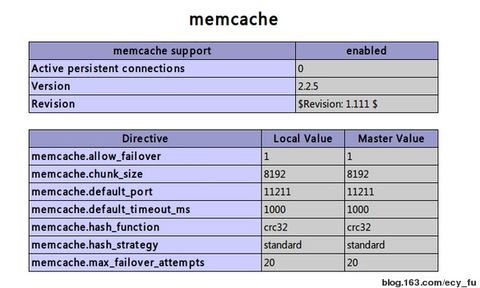
打开”/etc/php5/conf.d”目录,新建一个memcache.ini文件,在文件中输入”extension=memcache.so”,保存并退出,接下来重启apache服务器,然后再刷新下上面那个phpinfo.php页面,此时将能看到以下内容:
这就意味着memcache已经能正常工作了,接下来就是测试使用memcache是否能正常访问memcached服务器了。
在”/var/www”目录下新建一个testmemcache.php文本文件,输入以下内容:
[codesyntax lang="php"]

<?php
 $memcache = new Memcache;
 $memcache->connect('127.0.0.1', 11211) or die ("Could not connect");

 $version = $memcache->getVersion();

 echo "Server's version: ".$version;
 echo "<br>";

 $memcache->set('foo', 'bar');Ok,这就搞定了

 echo "<br>";

 $get_result = $memcache->get('foo');

 echo "Data from the cache:";
 echo "<br>";

 var_dump($get_result);

 $memcache->close();
?>
[/codesyntax]
首先启动memcached服务器,然后在浏览器地址栏输入http://127.0.0.1/testmemcache.php,结果显示如下:
Server’s version: 1.2.8
Data from the cache:
string(3) “bar”
使用php操作MySQL数据库[ ]
要使用php操作MySQL数据库,首先必须安装php5-mysql这个包,否则连接时会提示无法找到mysql_connect这些函数。安装成功之后,在”/var/www/”目录下创建一个文本文件-testmysql.php,输入以下内容:
[codesyntax lang="php"]

<?php
 $username='root';    //输入正确的用户名和密码
 $passwd='dandan';

 //连接数据库
 $link_mess=mysql_connect('localhost', $username, $passwd);

 //显示数据库连接的返回信息
 if (!$link_mess){
  echo "failed to connect the server  "; echo "<br>";
  exit();
 }
 else
 {
  echo "connect the server successfully  ";  echo "<br>";
 }

 //选择数据库
 mysql_select_db("test", $link_mess);

 //创建一个新表
 $createtable="create table students(
   stu_no char(9) not null primary key,
   stu_name char(10) not null,
   stu_age int)";

 mysql_query($createtable, $link_mess);

 //插入数据
 $insertrec="insert into students (stu_no, stu_name, stu_age) values ('1000', 'ecy fu', 24)";
 mysql_query($insertrec, $link_mess);

 //查询数据
 $result=mysql_query("select stu_no, stu_name, stu_age from students", $link_mess);

 $row=mysql_fetch_row($result);
 echo "No: "; echo $row[0]; echo "<br>";
 echo  "Name: " ; echo $row[2]; echo "<br>";
 echo  "Age: "; echo $row[1]; echo "<br>";
?>
[/codesyntax]
在浏览器中输入http://127.0.0.1/testmysql.php,此时能看见如下内容:
connect the server successfully
No: 1000
Name: 24
Age: ecy fu
将数据缓存在memcache中[ ]
以下的实例中引用了上面的数据库:
[codesyntax lang="php"]

<?php
    # Connect to memcache:
    global $memcache;
    $memcache = new Memcache;

    $memcache->connect('127.0.0.1', 11211) or die ("Could not connect");

    $version = $memcache->getVersion();
    echo "Server's version: ".$version;
    echo "<br>";

    //下面两个函数首先都会判断是否有使用memcache,如果有使用,就会调用memcached的set/get命令来保存和获取数据
    //否则简单地返回false
    # Gets key / value pair into memcache … called by mysql_query_cache()
    function getCache($key) {
        global $memcache;
        return ($memcache) ? $memcache->get($key) : false;
    }

    # Puts key / value pair into memcache … called by mysql_query_cache()
    function setCache($key, $object, $timeout = 60) {
        global $memcache;
        return ($memcache) ? $memcache->set($key,$object,MEMCACHE_COMPRESSED,$timeout) : false;
    }

    # Caching version of mysql_query()
    function mysql_query_cache($sql, $linkIdentifier = false,$timeout = 60) {

  //首先调用上面的getCache函数,如果返回值不为false的话,就说明是从memcached服务器获取的数据
  //如果返回false,此时就需要直接从数据库中获取数据了。
  //需要注意的是这里使用操作的命令加上sql语句的md5码作为一个特定的key,可能大家觉得使用数据项的
  //名称作为key会比较自然一点。运行memcached加上"-vv"参数,并且不作为daemon运行的话,可以看见
  //memcached处理时输出的相关信息
        if (!($cache = getCache(md5("mysql_query" . $sql)))) {

            $cache = false;

            $r = ($linkIdentifier !== false) ? mysql_query($sql,$linkIdentifier) : mysql_query($sql);

   //读取数据库,并将结果放入$cache数组中
            if (is_resource($r) && (($rows = mysql_num_rows($r)) != 0)) {
                for ($i=0;$i<$rows;$i++) {
                    $fields = mysql_num_fields($r);
                    $row = mysql_fetch_array($r);
                    for ($j=0;$j<$fields;$j++) {
                        if ($i == 0) {
                            $columns[$j] = mysql_field_name($r,$j);
                        }
                        $cache[$i][$columns[$j]] = $row[$j];
                    }
                }

    //将数据放入memcached服务器中,如果memcached服务器没有开的话,此语句什么也不会做
    //如果开启了服务器的话,数据将会被缓存到memcached服务器中
                if (!setCache(md5("mysql_query" . $sql), $cache, $timeout)) {
                    # If we get here, there isn’t a memcache daemon running or responding
                }

            }
        }
        return $cache;
    }
?>

<?php
    $username='root';    //输入正确的用户名和密码
    $passwd='dandan';

    //连接数据库
    $link_mess=mysql_connect('localhost', $username, $passwd);

    //显示数据库连接的返回信息
    if (!$link_mess){
        echo "failed to connect the server  "; echo "<br>";
        exit();
    }
    else
    {
        echo "connect the server successfully  ";  echo "<br>";
    }

    //选择数据库
    mysql_select_db("test", $link_mess);

    $sql = "select * from students;";

    //这里是没有使用memcached时的操作,将其注释掉了,它运行不会有问题的
    # Before: [without memcache]
    /*$rSlowQuery = mysql_query($sql);

    $row=mysql_fetch_row($rSlowQuery);
    echo "No: "; echo $row[0]; echo "<br>";
    echo  "Name: " ; echo $row[2]; echo "<br>";
    echo  "Age: "; echo $row[1]; echo "<br>";*/

    //这里是使用memcached时的操作
    # After: [with memcache]
    $rSlowQuery = mysql_query_cache($sql);

    # $rSlowQuery is an array
    $rows = count($rSlowQuery);

    for ($i=0; $i<$rows; $i++) {
  $stu_no = $rSlowQuery[$i]["stu_no"];
  $stu_name = $rSlowQuery[$i]["stu_name"];
  $stu_age = intval($rSlowQuery[$i]["stu_age"]);

  echo "No: "; echo $stu_no; echo "<br>";
  echo  "Name: " ; echo $stu_name; echo "<br>";
  echo  "Age: "; echo $stu_age; echo "<br>";
    }
?>
[/codesyntax]
memcached服务器输出以下信息:
<10 version >10 VERSION 1.2.8
<10 get a72ce670d58c49583ae9817a40dabda7 >10 sending key a72ce670d58c49583ae9817a40dabda7
>10 END
浏览器显示如下信息:
Server’s version: 1.2.8
connect the server successfully
No: 1000
Name: ecy fu
Age: 24
到这里,工作基本上都完成了!


