当下Kubernetes已经成为了容器编排的主流平台。本教程将引导大家完成一个基于Kubernetes的集群配置,采用一主二从的架构,以支持高可用性和负载均衡。文中将使用Ubuntu操作系统,并安装KubeSphere作为容器管理平台,结合Rook提供的Ceph存储解决方案,为应用提供强大的支持。
一、环境需求
本教程以一主二从为例,需要三台服务器。
1、服务器配置
主机需求:
- CPU:4 核
- 内存:8 GB
- 硬盘:40 GB x 2(需保留一个未分区的磁盘)
从机需求:
- CPU:4 核
- 内存:4 GB
- 硬盘:40 GB x 2(需保留一个未分区的磁盘)
软件版本:
- Ubuntu:22.04
- KubeSphere:3.4.1
- Docker:19.3.8+
- Kubernetes:1.23.17
- Rook:1.13.6
2、前置要求
- 集群中的所有机器需相互连通(可通过公网或内网);
- 节点之间不应有重复的主机名、MAC 地址或 product_uuid;
- 服务器需能够流畅访问以下仓库:github、dockerhub、registry.k8s.io、ghcr.io等。
二、安装步骤
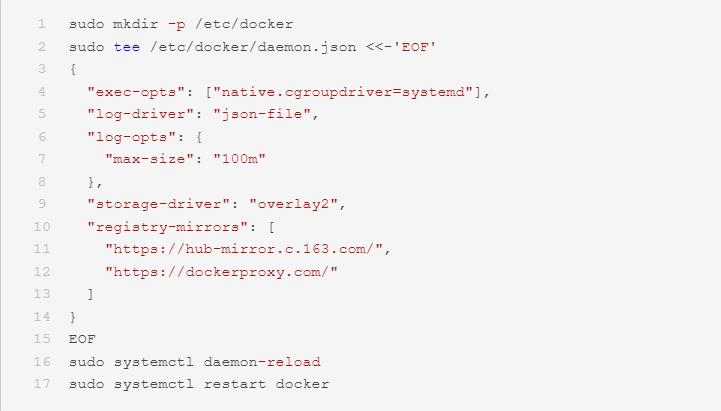
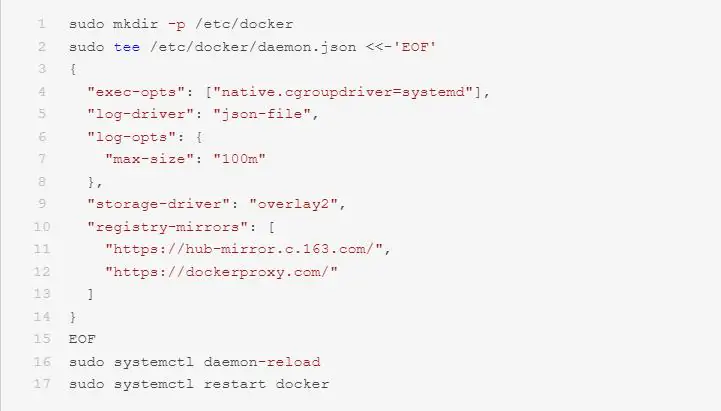
1、配置Cgroup驱动(可根据需求选择是否加速仓库)
2、配置Docker存储库并安装Docker

3、关闭交换分区
sudo sed -ri 's/.*swap.*/#&/' /etc/fstab
sudo swapoff -a
sudo sed -ri 's/.*swap.*/#&/' /etc/fstab
sudo swapoff -a
sudo sed -ri 's/.*swap.*/#&/' /etc/fstab
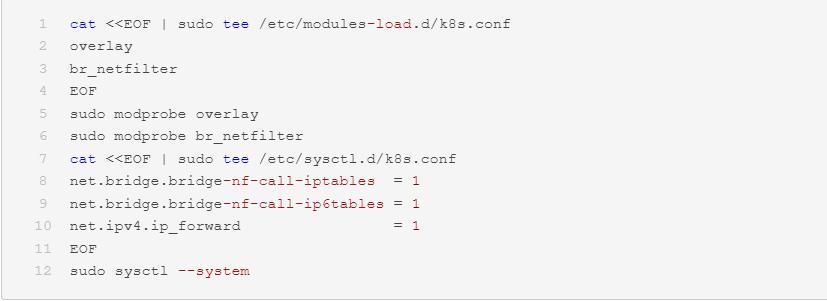
4、允许iptables检查桥接流量

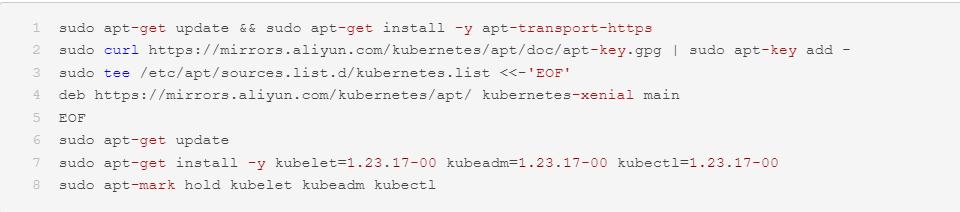
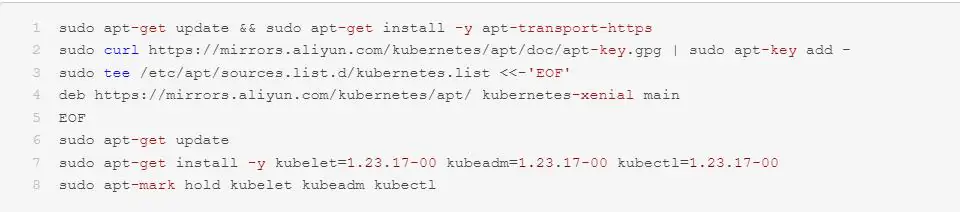
5、安装Kubeadm、Kubelet和Kubectl
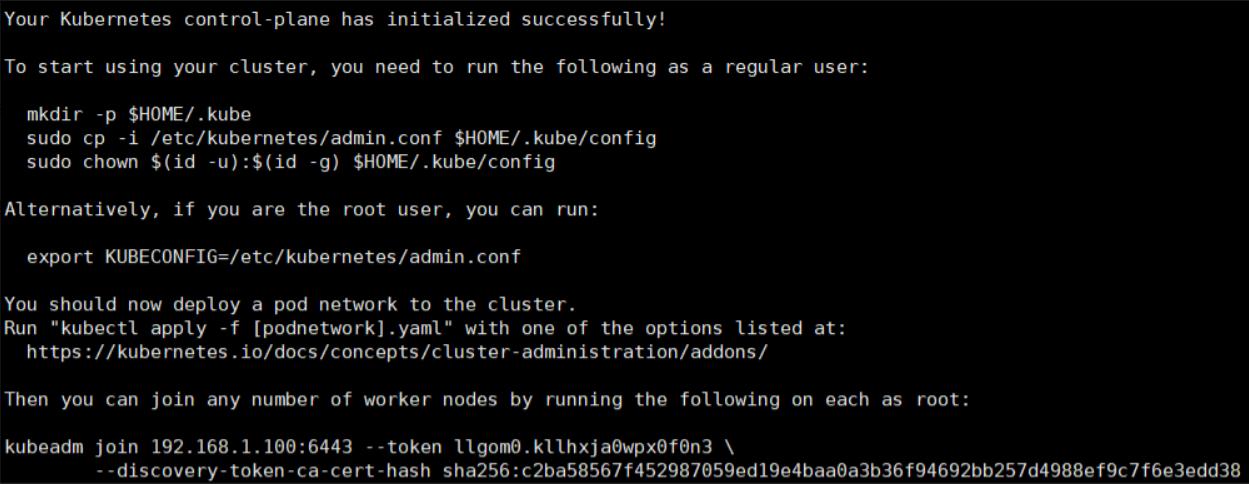
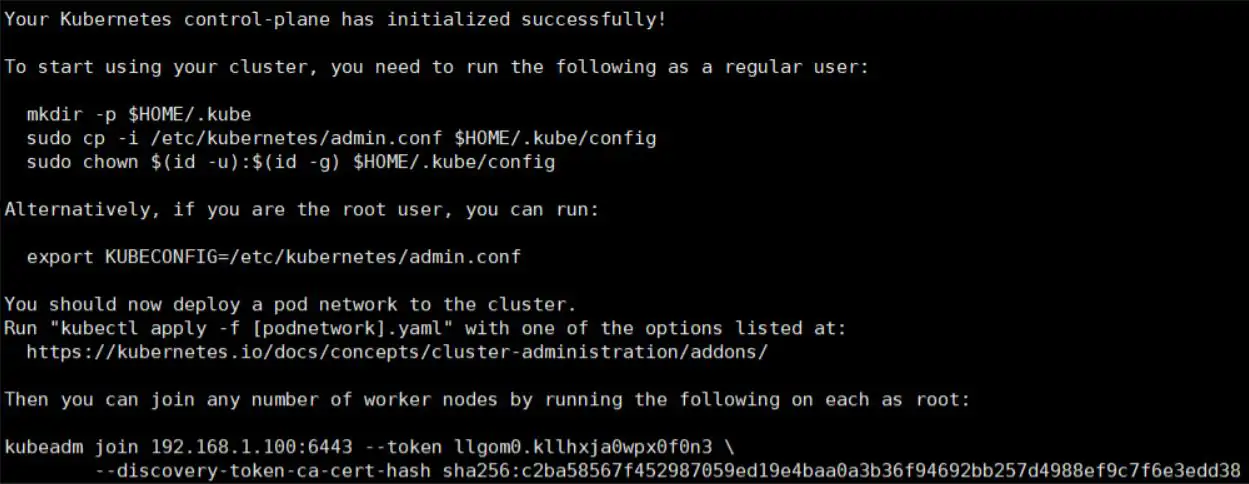
6、初始化控制平面节点(仅主节点执行)
--image-repository registry.cn-hangzhou.aliyuncs.com/google_containers \
--kubernetes-version v1.23.17 \
--pod-network-cidr=10.244.0.0/16
sudo kubeadm init \
--image-repository registry.cn-hangzhou.aliyuncs.com/google_containers \
--kubernetes-version v1.23.17 \
--pod-network-cidr=10.244.0.0/16
sudo kubeadm init \
--image-repository registry.cn-hangzhou.aliyuncs.com/google_containers \
--kubernetes-version v1.23.17 \
--pod-network-cidr=10.244.0.0/16
成功初始化后,复制保存输出中的token(有效期为24小时)。
执行以下命令:
sudo cp -i /etc/kubernetes/admin.conf $HOME/.kube/config
sudo chown $(id -u):$(id -g) $HOME/.kube/config
mkdir -p $HOME/.kube
sudo cp -i /etc/kubernetes/admin.conf $HOME/.kube/config
sudo chown $(id -u):$(id -g) $HOME/.kube/config
mkdir -p $HOME/.kube
sudo cp -i /etc/kubernetes/admin.conf $HOME/.kube/config
sudo chown $(id -u):$(id -g) $HOME/.kube/config
7、安装Pod网络附加组件(仅主节点执行,选择一种方式)
方式一(镜像):
kubectl apply -f https://gitee.com/yfeil/k8s/releases/download/1.23.17/kube-flannel.yml
kubectl apply -f https://gitee.com/yfeil/k8s/releases/download/1.23.17/kube-flannel.yml
kubectl apply -f https://gitee.com/yfeil/k8s/releases/download/1.23.17/kube-flannel.yml
方式二(官方):
kubectl apply -f https://github.com/flannel-io/flannel/releases/download/v0.24.4/kube-flannel.yml
kubectl apply -f https://github.com/flannel-io/flannel/releases/download/v0.24.4/kube-flannel.yml
kubectl apply -f https://github.com/flannel-io/flannel/releases/download/v0.24.4/kube-flannel.yml
查看安装是否完成:
watch kubectl get pod -n kube-system -o wide
watch kubectl get pod -n kube-system -o wide
watch kubectl get pod -n kube-system -o wide
8、配置hosts
根据实际IP和主机名更新:
sudo tee -a /etc/hosts <<EOF
sudo tee -a /etc/hosts <<EOF
192.168.1.100 k8s1
192.168.1.101 k8s2
192.168.1.102 k8s3
EOF
sudo tee -a /etc/hosts <<EOF
192.168.1.100 k8s1
192.168.1.101 k8s2
192.168.1.102 k8s3
EOF
检查hosts文件:
cat /etc/hosts
9、从节点加入主节点
在从节点执行保存的token(非root用户前面加上sudo):
sudo kubeadm join 192.168.1.100:6443 --token\
--discovery-token-ca-cert-hash sha256:
sudo kubeadm join 192.168.1.100:6443 --token\
--discovery-token-ca-cert-hash sha256:
sudo kubeadm join 192.168.1.100:6443 --token\
--discovery-token-ca-cert-hash sha256:
成功输出后,执行以下命令查看节点状态:

如果失败,尝试重置Kubeadm(在从节点执行):
sudo kubeadm reset
关闭防火墙(主从节点均执行):
sudo systemctl stop firewalld
sudo systemctl disable firewalld
sudo systemctl stop firewalld
sudo systemctl disable firewalld
sudo systemctl stop firewalld
sudo systemctl disable firewalld
10、删除污点(仅主节点执行)
kubectl taint nodes <主节点名,比如k8s1> node-role.kubernetes.io/master:NoSchedule-
kubectl taint nodes <主节点名,比如k8s1> node-role.kubernetes.io/master:NoSchedule-
kubectl taint nodes <主节点名,比如k8s1> node-role.kubernetes.io/master:NoSchedule-
11、安装Rook-Ceph(仅主节点执行,选择一种方式)
方式一(镜像):
sudo apt-get install git -y
git clone --single-branch --branch v1.13.6-edit https://gitee.com/yfeil/rook.git
sudo apt-get install git -y
git clone --single-branch --branch v1.13.6-edit https://gitee.com/yfeil/rook.git
sudo apt-get install git -y
git clone --single-branch --branch v1.13.6-edit https://gitee.com/yfeil/rook.git
方式二(官方):
sudo apt-get install git -y
git clone --single-branch --branch v1.13.6 https://github.com/rook/rook.git
sudo apt-get install git -y
git clone --single-branch --branch v1.13.6 https://github.com/rook/rook.git
sudo apt-get install git -y
git clone --single-branch --branch v1.13.6 https://github.com/rook/rook.git
执行命令:
kubectl create -f rook/deploy/examples/crds.yaml \
-f rook/deploy/examples/common.yaml \
-f rook/deploy/examples/operator.yaml
kubectl create -f rook/deploy/examples/cluster.yaml
kubectl create -f rook/deploy/examples/crds.yaml \
-f rook/deploy/examples/common.yaml \
-f rook/deploy/examples/operator.yaml
kubectl create -f rook/deploy/examples/cluster.yaml
kubectl create -f rook/deploy/examples/crds.yaml \
-f rook/deploy/examples/common.yaml \
-f rook/deploy/examples/operator.yaml
kubectl create -f rook/deploy/examples/cluster.yaml
待安装完成(需要十分钟左右),使用 watch kubectl get pods -n rook-ceph 来确认安装进度,
安装完至少需要有以下pod:
rook-ceph-mgr-a-****
rook-ceph-mgr-b-****
rook-ceph-mon-a-****
rook-ceph-mon-b-****
rook-ceph-mon-c-****
rook-ceph-osd-0-****
rook-ceph-osd-1-****
rook-ceph-osd-2-****
rook-ceph-mgr-a-****
rook-ceph-mgr-b-****
rook-ceph-mon-a-****
rook-ceph-mon-b-****
rook-ceph-mon-c-****
rook-ceph-osd-0-****
rook-ceph-osd-1-****
rook-ceph-osd-2-****
且除 rook-ceph-osd-prepare-*** 以外,其他都要为Running。
12、创建默认StorageClass(仅主节点执行)
kubectl create -f rook/deploy/examples/filesystem.yaml
kubectl create -f rook/deploy/examples/csi/cephfs/storageclass.yaml
kubectl patch storageclass rook-cephfs -p '{"metadata": {"annotations":{"storageclass.kubernetes.io/is-default-class":"true"}}}'
kubectl create -f rook/deploy/examples/filesystem.yaml
kubectl create -f rook/deploy/examples/csi/cephfs/storageclass.yaml
kubectl patch storageclass rook-cephfs -p '{"metadata": {"annotations":{"storageclass.kubernetes.io/is-default-class":"true"}}}'
kubectl create -f rook/deploy/examples/filesystem.yaml
kubectl create -f rook/deploy/examples/csi/cephfs/storageclass.yaml
kubectl patch storageclass rook-cephfs -p '{"metadata": {"annotations":{"storageclass.kubernetes.io/is-default-class":"true"}}}'
使用以下命令确认是否成功:
kubectl get sc
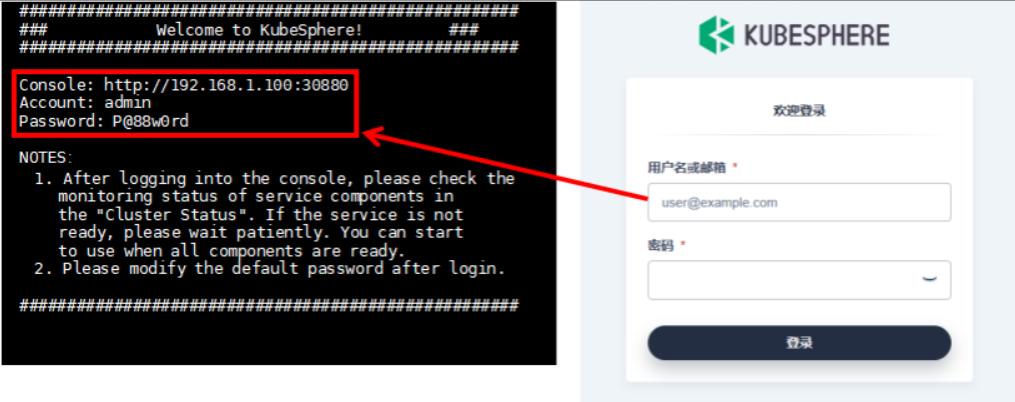
13、安装KubeSphere(仅主节点执行,选择一种方式)
方式一(镜像):
kubectl apply -f https://gitee.com/yfeil/k8s/releases/download/1.23.17/kubesphere-installer.yaml
kubectl apply -f https://gitee.com/yfeil/k8s/releases/download/1.23.17/cluster-configuration.yaml
kubectl apply -f https://gitee.com/yfeil/k8s/releases/download/1.23.17/kubesphere-installer.yaml
kubectl apply -f https://gitee.com/yfeil/k8s/releases/download/1.23.17/cluster-configuration.yaml
kubectl apply -f https://gitee.com/yfeil/k8s/releases/download/1.23.17/kubesphere-installer.yaml
kubectl apply -f https://gitee.com/yfeil/k8s/releases/download/1.23.17/cluster-configuration.yaml
方式二(官方):
kubectl apply -f https://github.com/kubesphere/ks-installer/releases/download/v3.4.1/kubesphere-installer.yaml
kubectl apply -f https://github.com/kubesphere/ks-installer/releases/download/v3.4.1/cluster-configuration.yaml
kubectl apply -f https://github.com/kubesphere/ks-installer/releases/download/v3.4.1/kubesphere-installer.yaml
kubectl apply -f https://github.com/kubesphere/ks-installer/releases/download/v3.4.1/cluster-configuration.yaml
kubectl apply -f https://github.com/kubesphere/ks-installer/releases/download/v3.4.1/kubesphere-installer.yaml
kubectl apply -f https://github.com/kubesphere/ks-installer/releases/download/v3.4.1/cluster-configuration.yaml
查看安装进度:
kubectl logs -n kubesphere-system $(kubectl get pod -n kubesphere-system -l 'app in (ks-install, ks-installer)' -o jsonpath='{.items[0].metadata.name}') -f
kubectl logs -n kubesphere-system $(kubectl get pod -n kubesphere-system -l 'app in (ks-install, ks-installer)' -o jsonpath='{.items[0].metadata.name}') -f
kubectl logs -n kubesphere-system $(kubectl get pod -n kubesphere-system -l 'app in (ks-install, ks-installer)' -o jsonpath='{.items[0].metadata.name}') -f

-

广告合作
-

QQ群号:707632017