Pinecone是一个为高性能AI应用程序提供长期内存的云原生矢量数据库,提供了一个简化的API,消除了基础设施管理的麻烦。Pinecone能够在数十亿向量的规模上以低延迟提供新鲜、相关的查询结果。本教程主要介绍如何快速设置和使用Pinecone矢量数据库。
一、注册并登录Pinecone
注册一个免费的Pinecone帐户或登录现有的帐户:
API密钥将在下一部分中显示。在免费的Starter计划中,可以获得1个项目、AWS区域的5个无服务器索引以及高达2GB的存储空间。尽管Starter计划比其他计划有更严格的限制,但可以在准备好时进行升级。us-east-1
二、获取API密钥
需要一个API密钥才能对Pinecone项目进行API调用。复制生成的密钥:
PINECONE_API_KEY="YOUR_API_KEY"
或者,可以从Pinecone控制台获取密钥:
1、打开Pinecone控制台。
2、选择项目。
3、转到API密钥。
4、复制API密钥。
三、安装Pinecone SDK
Pinecone公开了一个简单的REST API,用于与其矢量数据库进行交互。可以直接使用API,也可以使用官方的Python、Node.js、Java或Go SDK之一:
Python:
pip install "pinecone-client[grpc]"
# To install without gRPC run:
# pip3 install pinecone-client
JavaScript:
npm install @pinecone-database/pinecone
Java:
// Maven
<dependency>
<groupId>io.pinecone</groupId>
<artifactId>pinecone-client</artifactId>
<version>2.0.0</version>
</dependency>
// Gradle
implementation "io.pinecone:pinecone-client:2.0.0"
Go:
# Add a dependency to the current module:
go get github.com/pinecone-io/go-pinecone/pinecone
四、初始化客户端连接
直接使用API时,每个HTTP请求都必须包含一个指定API密钥的标头。将在所有后续示例中看到这一点。Api-Keycurl
Python:
from pinecone.grpc import PineconeGRPC as Pinecone
from pinecone import ServerlessSpec
pc = Pinecone(api_key='YOUR_API_KEY')
JavaScript:
import { Pinecone } from '@pinecone-database/pinecone';
const pc = new Pinecone({ apiKey: 'YOUR_API_KEY' });
Java:
import io.pinecone.clients.Pinecone;
import org.openapitools.control.client.model.*;
public class InitializeClientExample {
public static void main(String[] args) {
Pinecone pc = new Pinecone.Builder("YOUR_API_KEY").build();
}
}
Go:
package main
import (
"context"
"encoding/json"
"fmt"
"log"
"github.com/pinecone-io/go-pinecone/pinecone"
)
func prettifyStruct(obj interface{}) string {
bytes, _ := json.MarshalIndent(obj, "", " ")
return string(bytes)
}
func main() {
ctx := context.Background()
pc, err := pinecone.NewClient(pinecone.NewClientParams{
ApiKey: "YOUR_API_KEY",
})
if err != nil {
log.Fatalf("Failed to create Client: %v", err)
}
}
五、创建无服务器索引
在Pinecone中,索引是数据的最高级别的组织单位,可以在其中定义要存储的向量的维度以及查询它们时要使用的相似度指标。通常,根据用于创建向量的嵌入模型选择维度和相似度指标。
创建一个名为Serverless索引,该索引存储2维向量,并使用余弦相似度指标执行最近邻搜索:docs-quickstart-index
Python:
index_name = "docs-quickstart-index"
if index_name not in pc.list_indexes().names():
pc.create_index(
name=index_name,
dimension=2,
metric="cosine",
spec=ServerlessSpec(
cloud='aws',
region='us-east-1'
)
)
JavaScript:
const indexName = "docs-quickstart-index"
await pc.createIndex({
name: indexName,
dimension: 2,
metric: 'cosine',
spec: {
serverless: {
cloud: 'aws',
region: 'us-east-1'
}
}
});
Java:
import io.pinecone.clients.Pinecone;
public class CreateServerlessIndexExample {
public static void main(String[] args) {
Pinecone pc = new Pinecone.Builder("YOUR_API_KEY").build();
pc.createServerlessIndex("docs-quickstart-index", "cosine", 2, "aws", "us-east-1");
}
}
Go:
// Add to the main function:
idx, err := pc.CreateServerlessIndex(ctx, &pinecone.CreateServerlessIndexRequest{
Name: "docs-quickstart-index",
Dimension: 2,
Metric: pinecone.Cosine,
Cloud: pinecone.Aws,
Region: "us-east-1",
})
if err != nil {
log.Fatalf("Failed to create serverless index: %v", idx.Name)
} else {
fmt.Printf("Successfully created serverless index: %v", idx.Name)
}
curl:
PINECONE_API_KEY="YOUR_API_KEY"
curl -s -X POST "https://api.pinecone.io/indexes" \
-H "Accept: application/json" \
-H "Content-Type: application/json" \
-H "Api-Key: $PINECONE_API_KEY" \
-H "X-Pinecone-API-Version: 2024-07" \
-d '{
"name": "docs-quickstart-index",
"dimension": 2,
"metric": "cosine",
"spec": {
"serverless": {
"cloud": "aws",
"region": "us-east-1"
}
}
}'
在本快速入门中,你将在AWS区域(默认)中创建无服务器索引。Pinecone支持多个云提供商和地区。us-east-1
六、更新插入向量
在索引中,向量存储在命名空间中,并且所有更新插入、查询和其他数据操作始终针对一个命名空间:
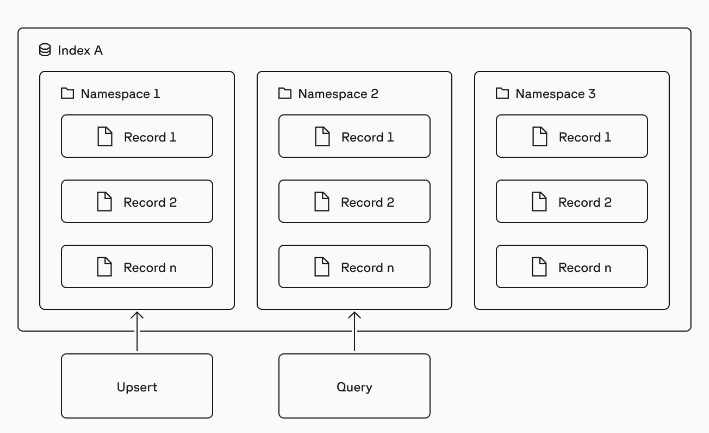
当需要隔离每个客户/用户的数据时,命名空间对于实现多租户至关重要。
现在,已经创建了索引,请定位索引并使用upsert操作将6个二维向量写入2个不同的命名空间:docs-quickstart-index
Python:
index = pc.Index(index_name)
index.upsert(
vectors=[
{"id": "vec1", "values": [1.0, 1.5]},
{"id": "vec2", "values": [2.0, 1.0]},
{"id": "vec3", "values": [0.1, 3.0]},
],
namespace="ns1"
)
index.upsert(
vectors=[
{"id": "vec1", "values": [1.0, -2.5]},
{"id": "vec2", "values": [3.0, -2.0]},
{"id": "vec3", "values": [0.5, -1.5]},
],
namespace="ns2"
)
JavaScript:
const index = pc.index(indexName);
await index.namespace("ns1").upsert([
{
"id": "vec1",
"values": [1.0, 1.5]
},
{
"id": "vec2",
"values": [2.0, 1.0]
},
{
"id": "vec3",
"values": [0.1, 3.0]
}
]);
await index.namespace("ns2").upsert([
{
"id": "vec1",
"values": [1.0, -2.5]
},
{
"id": "vec2",
"values": [3.0, -2.0]
},
{
"id": "vec3",
"values": [0.5, -1.5]
}
]);
Java:
import io.pinecone.clients.Index;
import io.pinecone.clients.Pinecone;
import java.util.Arrays;
import java.util.List;
public class UpsertExample {
public static void main(String[] args) {
Pinecone pc = new Pinecone.Builder("YOUR_API_KEY").build();
String indexName = "docs-quickstart-index";
Index index = pc.getIndexConnection(indexName);
List<Float> values1 = Arrays.asList(1.0f, 1.5f);
List<Float> values2 = Arrays.asList(2.0f, 1.0f);
List<Float> values3 = Arrays.asList(0.1f, 3.0f);
List<Float> values4 = Arrays.asList(1.0f, -2.5f);
List<Float> values5 = Arrays.asList(3.0f, -2.0f);
List<Float> values6 = Arrays.asList(0.5f, -1.5f);
index.upsert("vec1", values1, "ns1");
index.upsert("vec2", values2, "ns1");
index.upsert("vec3", values3, "ns1");
index.upsert("vec1", values4, "ns2");
index.upsert("vec2", values5, "ns2");
index.upsert("vec3", values6, "ns2");
}
}
Go:
// Add to the main function:
idx, err := pc.DescribeIndex(ctx, indexName)
if err != nil {
log.Fatalf("Failed to describe index \"%v\": %v", idx.Name, err)
}
idxConnection1, err := pc.Index(pinecone.NewIndexConnParams{Host: idx.Host, Namespace: "ns1"})
if err != nil {
log.Fatalf("Failed to create IndexConnection1 for Host %v: %v", idx.Host, err)
}
idxConnection2, err := pc.Index(pinecone.NewIndexConnParams{Host: idx.Host, Namespace: "ns2"})
if err != nil {
log.Fatalf("Failed to create IndexConnection1 for Host %v: %v", idx.Host, err)
}
vectors1 := []*pinecone.Vector{
{
Id: "vec1",
Values: []float32{1.0, 1.5},
},
{
Id: "vec2",
Values: []float32{2.0, 1.0},
},
{
Id: "vec3",
Values: []float32{0.1, 3.0},
},
}
vectors2 := []*pinecone.Vector{
{
Id: "vec1",
Values: []float32{1.0, -2.5},
},
{
Id: "vec2",
Values: []float32{3.0, -2.0},
},
{
Id: "vec3",
Values: []float32{0.5, -1.5},
},
}
count1, err := idxConnection1.UpsertVectors(ctx, vectors1)
if err != nil {
log.Fatalf("Failed to upsert vectors: %v", err)
} else {
fmt.Printf("Successfully upserted %d vector(s)!\n", count1)
}
count2, err := idxConnection2.UpsertVectors(ctx, vectors2)
if err != nil {
log.Fatalf("Failed to upsert vectors: %v", err)
} else {
fmt.Printf("Successfully upserted %d vector(s)!\n", count2)
}
curl:
# The `POST` requests below uses the unique endpoint for an index.
# See https://docs.pinecone.io/guides/data/get-an-index-endpoint for details.
PINECONE_API_KEY="YOUR_API_KEY"
INDEX_HOST="INDEX_HOST"
curl -X POST "https://$INDEX_HOST/vectors/upsert" \
-H "Api-Key: $PINECONE_API_KEY" \
-H 'Content-Type: application/json' \
-H "X-Pinecone-API-Version: 2024-07" \
-d '{
"vectors": [
{
"id": "vec1",
"values": [1.0, 1.5]
},
{
"id": "vec2",
"values": [2.0, 1.0]
},
{
"id": "vec3",
"values": [0.1, 3.0]
}
],
"namespace": "ns1"
}'
curl -X POST "https://$INDEX_HOST/vectors/upsert" \
-H "Api-Key: $PINECONE_API_KEY" \
-H 'Content-Type: application/json' \
-H "X-Pinecone-API-Version: 2024-07" \
-d '{
"vectors": [
{
"id": "vec1",
"values": [1.0, -2.5]
},
{
"id": "vec2",
"values": [3.0, -2.0]
},
{
"id": "vec3",
"values": [0.5, -1.5]
}
],
"namespace": "ns2"
}'
在对大量数据进行更新插入时,建议对大批量更新插入记录。这应该尽可能大(最多1000条记录),但不超过2MB的最大请求大小。
七、检查索引
Pinecone是最终一致的,因此在可以查询更新插入的向量之前可能会有延迟。使用describe_index_stats操作检查当前向量计数是否与已更新插入的向量数匹配:
Python:
print(index.describe_index_stats())
# Returns:
# {'dimension': 2,
# 'index_fullness': 0.0,
# 'namespaces': {'ns1': {'vector_count': 3}, 'ns2': {'vector_count': 3}},
# 'total_vector_count': 6}
JavaScript:
const stats = await index.describeIndexStats();
console.log(stats)
// Returns:
// {
// namespaces: { ns1: { recordCount: 3 }, ns2: { recordCount: 3 } },
// dimension: 2,
// indexFullness: 0.00008,
// totalRecordCount: 6
// }
Java:
import io.pinecone.clients.Index;
import io.pinecone.clients.Pinecone;
import io.pinecone.proto.DescribeIndexStatsResponse;
public class DescribeIndexStatsExample {
public static void main(String[] args) {
Pinecone pc = new Pinecone.Builder("YOUR_API_KEY").build();
String indexName = "docs-quickstart-index";
Index index = pc.getIndexConnection(indexName);
DescribeIndexStatsResponse indexStatsResponse = index.describeIndexStats(null);
System.out.println(indexStatsResponse);
}
}
// Returns:
// namespaces {
// key: "ns1"
// value {
// vector_count: 3
// }
// }
// namespaces {
// key: "ns2"
// value {
// vector_count: 3
// }
// }
// dimension: 2
// total_vector_count: 6
Go:
// Add to the main function:
stats, err := idxConnection1.DescribeIndexStats(ctx)
if err != nil {
log.Fatalf("Failed to describe index \"%v\": %v", idx.Name, err)
} else {
fmt.Printf("%+v", *stats)
}
// Returns:
// {
// "dimension": 2,
// "index_fullness": 0,
// "total_vector_count": 6,
// "namespaces": {
// "ns1": {
// "vector_count": 3
// },
// "ns2": {
// "vector_count": 3
// }
// }
// }
curl:
# The `POST` request below uses the unique endpoint for an index.
# See https://docs.pinecone.io/guides/data/get-an-index-endpoint for details.
PINECONE_API_KEY="YOUR_API_KEY"
INDEX_HOST="INDEX_HOST"
curl -X POST "https://$INDEX_HOST/describe_index_stats" \
-H "Api-Key: $PINECONE_API_KEY" \
-H "X-Pinecone-API-Version: 2024-07"
# Output:
# {
# "namespaces": {
# "ns1": {
# "vectorCount": 3
# },
# "ns2": {
# "vectorCount": 3
# }
# },
# "dimension": 2,
# "indexFullness": 0.00008,
# "totalVectorCount": 6
# }
八、运行相似性搜索
使用为索引指定的余弦相似度指标,在索引中的每个命名空间中查询与示例二维向量最相似的3个向量:
Python:
query_results1 = index.query(
namespace="ns1",
vector=[1.0, 1.5],
top_k=3,
include_values=True
)
print(query_results1)
query_results2 = index.query(
namespace="ns2",
vector=[1.0,-2.5],
top_k=3,
include_values=True
)
print(query_results2)
# Returns:
# {'matches': [{'id': 'vec1', 'score': 1.0, 'values': [1.0, 1.5]},
# {'id': 'vec2', 'score': 0.868243158, 'values': [2.0, 1.0]},
# {'id': 'vec3', 'score': 0.850068152, 'values': [0.1, 3.0]}],
# 'namespace': 'ns1',
# 'usage': {'read_units': 6}}
# {'matches': [{'id': 'vec1', 'score': 1.0, 'values': [1.0, -2.5]},
# {'id': 'vec3', 'score': 0.998274386, 'values': [0.5, -1.5]},
# {'id': 'vec2', 'score': 0.824041963, 'values': [3.0, -2.0]}],
# 'namespace': 'ns2',
# 'usage': {'read_units': 6}}
JavaScript:
const queryResponse1 = await index.namespace("ns1").query({
topK: 3,
vector: [1.0, 1.5],
includeValues: true
});
const queryResponse2 = await index.namespace("ns2").query({
topK: 3,
vector: [1.0,-2.5],
includeValues: true
});
// Returns:
// {
// "matches": [
// {
// "id": "vec1",
// "score": 1,
// "values": [
// 1,
// 1.5
// ]
// },
// {
// "id": "vec2",
// "score": 0.868243158,
// "values": [
// 2,
// 1
// ]
// },
// {
// "id": "vec3",
// "score": 0.850068152,
// "values": [
// 0.1,
// 3
// ]
// }
// ],
// "namespace": "ns1",
// "usage": {
// "readUnits": 6
// }
// }
// {
// "matches": [
// {
// "id": "vec1",
// "score": 1,
// "values": [
// 1,
// -2.5
// ]
// },
// {
// "id": "vec3",
// "score": 0.998274386,
// "values": [
// 0.5,
// -1.5
// ]
// },
// {
// "id": "vec2",
// "score": 0.824041963,
// "values": [
// 3,
// -2
// ]
// }
// ],
// "namespace": "ns2",
// "usage": {
// "readUnits": 6
// }
// }
Java:
import io.pinecone.clients.Index;
import io.pinecone.clients.Pinecone;
import io.pinecone.proto.DescribeIndexStatsResponse;
public class DescribeIndexStatsExample {
public static void main(String[] args) {
Pinecone pc = new Pinecone.Builder("YOUR_API_KEY").build();
String indexName = "docs-quickstart-index";
Index index = pc.getIndexConnection(indexName);
DescribeIndexStatsResponse indexStatsResponse = index.describeIndexStats(null);
System.out.println(indexStatsResponse);
}
}
// Returns:
// namespaces {
// key: "ns1"
// value {
// vector_count: 3
// }
// }
// namespaces {
// key: "ns2"
// value {
// vector_count: 3
// }
// }
// dimension: 2
// total_vector_count: 6
Go:
// Add to the main function:
idx, err := pc.DescribeIndex(ctx, indexName)
if err != nil {
log.Fatalf("Failed to describe index \"%v\": %v", idx.Name, err)
}
idxConnection1, err := pc.Index(pinecone.NewIndexConnParams{Host: idx.Host, Namespace: "ns1"})
if err != nil {
log.Fatalf("Failed to create IndexConnection1 for Host %v: %v", idx.Host, err)
}
idxConnection2, err := pc.Index(pinecone.NewIndexConnParams{Host: idx.Host, Namespace: "ns2"})
if err != nil {
log.Fatalf("Failed to create IndexConnection1 for Host %v: %v", idx.Host, err)
}
vectors1 := []*pinecone.Vector{
{
Id: "vec1",
Values: []float32{1.0, 1.5},
},
{
Id: "vec2",
Values: []float32{2.0, 1.0},
},
{
Id: "vec3",
Values: []float32{0.1, 3.0},
},
}
vectors2 := []*pinecone.Vector{
{
Id: "vec1",
Values: []float32{1.0, -2.5},
},
{
Id: "vec2",
Values: []float32{3.0, -2.0},
},
{
Id: "vec3",
Values: []float32{0.5, -1.5},
},
}
count1, err := idxConnection1.UpsertVectors(ctx, vectors1)
if err != nil {
log.Fatalf("Failed to upsert vectors: %v", err)
} else {
fmt.Printf("Successfully upserted %d vector(s)!\n", count1)
}
count2, err := idxConnection2.UpsertVectors(ctx, vectors2)
if err != nil {
log.Fatalf("Failed to upsert vectors: %v", err)
} else {
fmt.Printf("Successfully upserted %d vector(s)!\n", count2)
}
curl:
# The `POST` requests below uses the unique endpoint for an index.
# See https://docs.pinecone.io/guides/data/get-an-index-endpoint for details.
PINECONE_API_KEY="YOUR_API_KEY"
INDEX_HOST="INDEX_HOST"
curl -X POST "https://$INDEX_HOST/vectors/upsert" \
-H "Api-Key: $PINECONE_API_KEY" \
-H 'Content-Type: application/json' \
-H "X-Pinecone-API-Version: 2024-07" \
-d '{
"vectors": [
{
"id": "vec1",
"values": [1.0, 1.5]
},
{
"id": "vec2",
"values": [2.0, 1.0]
},
{
"id": "vec3",
"values": [0.1, 3.0]
}
],
"namespace": "ns1"
}'
curl -X POST "https://$INDEX_HOST/vectors/upsert" \
-H "Api-Key: $PINECONE_API_KEY" \
-H 'Content-Type: application/json' \
-H "X-Pinecone-API-Version: 2024-07" \
-d '{
"vectors": [
{
"id": "vec1",
"values": [1.0, -2.5]
},
{
"id": "vec2",
"values": [3.0, -2.0]
},
{
"id": "vec3",
"values": [0.5, -1.5]
}
],
"namespace": "ns2"
}'
以上是一些简单的例子。随着对Pinecone的要求越来越高,会看到它在大规模上返回低延迟、准确的结果,索引多达数十亿个向量。
九、清理
当不再需要“docs-quickstart-index”索引时,请使用delete_index操作将其删除:
Python:
pc.delete_index(index_name)
JavaScript:
const queryResponse1 = await index.namespace("ns1").query({
topK: 3,
vector: [1.0, 1.5],
includeValues: true
});
const queryResponse2 = await index.namespace("ns2").query({
topK: 3,
vector: [1.0,-2.5],
includeValues: true
});
// Returns:
// {
// "matches": [
// {
// "id": "vec1",
// "score": 1,
// "values": [
// 1,
// 1.5
// ]
// },
// {
// "id": "vec2",
// "score": 0.868243158,
// "values": [
// 2,
// 1
// ]
// },
// {
// "id": "vec3",
// "score": 0.850068152,
// "values": [
// 0.1,
// 3
// ]
// }
// ],
// "namespace": "ns1",
// "usage": {
// "readUnits": 6
// }
// }
// {
// "matches": [
// {
// "id": "vec1",
// "score": 1,
// "values": [
// 1,
// -2.5
// ]
// },
// {
// "id": "vec3",
// "score": 0.998274386,
// "values": [
// 0.5,
// -1.5
// ]
// },
// {
// "id": "vec2",
// "score": 0.824041963,
// "values": [
// 3,
// -2
// ]
// }
// ],
// "namespace": "ns2",
// "usage": {
// "readUnits": 6
// }
// }
Java:
import io.pinecone.clients.Pinecone;
public class DeleteIndexExample {
public static void main(String[] args) {
Pinecone pc = new Pinecone.Builder("YOUR_API_KEY").build();
String indexName = "docs-quickstart-index";
pc.deleteIndex(indexName);
}
}
Go:
// Add to the main function:
err = pc.DeleteIndex(ctx, indexName)
if err != nil {
log.Fatalf("Failed to delete index: %v", err)
} else {
fmt.Println("Index \"%v\" deleted successfully", indexName)
}
curl:
PINECONE_API_KEY="YOUR_API_KEY"
curl -X DELETE "https://api.pinecone.io/indexes/docs-quickstart-index" \
-H "Accept: application/json" \
-H "Api-Key: $PINECONE_API_KEY" \
-H "X-Pinecone-API-Version: 2024-07"